How to Connect Calligraphy Letters Smoothly
Letters join through their exit strokes: one hairline ends a letter and begins the next. Learn the basic join, low and high joins, and the pairs worth practicing.
Practice at a glance
What you need
- Smooth practice paper
- Pencil and ruler
- Small-tip brush pen or pointed nib in a holder
- Ink, if using a dip pen
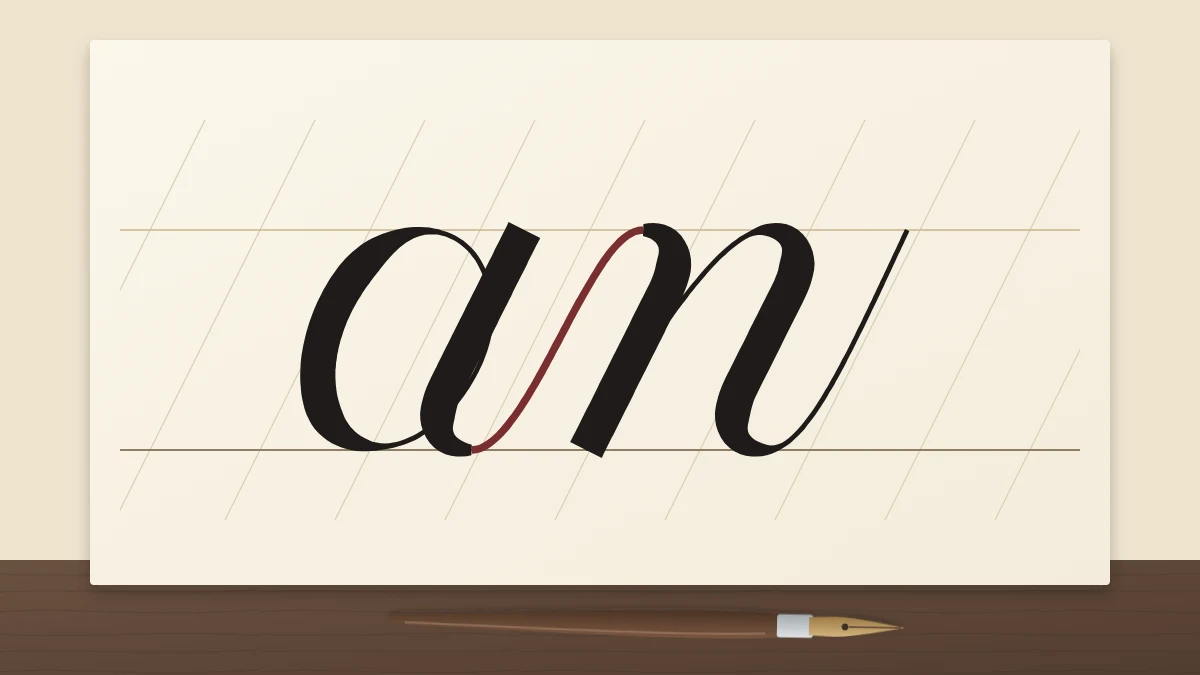
You can write a clean a and a clean n, yet the word “an” still looks like two letters pushed together. That is a common stage, and it has a simple cause: the letters were practiced alone, so nothing in them reaches toward a neighbor.
Learning how to connect calligraphy letters is less about adding a new stroke and more about noticing one you already make. Every join in a script word is carried by the thin stroke at the end of a letter.
Letters connect through their exit strokes
Most lowercase letters finish with an exit stroke, a hairline upstroke that leaves the last thick downstroke and rises to the right. Most letters also begin with an entrance stroke, a hairline that climbs toward the waistline.
In a word, those two hairlines are the same line. The exit of one letter becomes the entrance of the next, so you write it once and it serves both letters. You do not add a separate connector, and you do not write the whole word without lifting the pen.
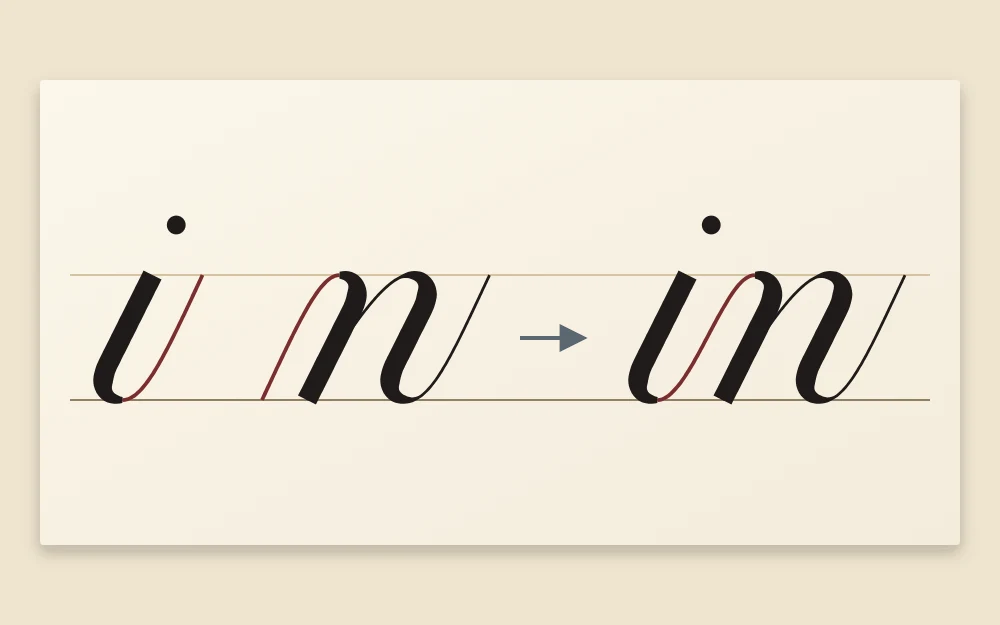
If any single letter still feels uncertain, a few lines of the lowercase letters in their stroke groups will make joining much easier, because every group ends its letters in a predictable way.
The basic join, step by step
Use the pair “in” for a first try. It has one low join and no ovals.
- Write the underturn of the i: thick down, a narrow turn at the baseline, thin going up.
- Let the exit hairline keep rising, with light pressure, until it reaches about the waistline. Follow your slant lines so it does not flatten out.
- Lift the pen.
- Place the tip exactly where the hairline ends and pull the first downstroke of the n.
- Complete the n with its compound curve, then go back and dot the i.
The lift in step three is what keeps the join clean. It lets you reset pressure from light to firm and aim the new downstroke, while the hairline still makes the two letters read as one shape.
Tip
Finish the exit stroke fully even when no letter follows. Letters that always end with a complete hairline are ready to join; letters that stop short at the baseline are not.
Low joins and high joins
Joins come in two kinds, depending on where the exit stroke leaves the letter.
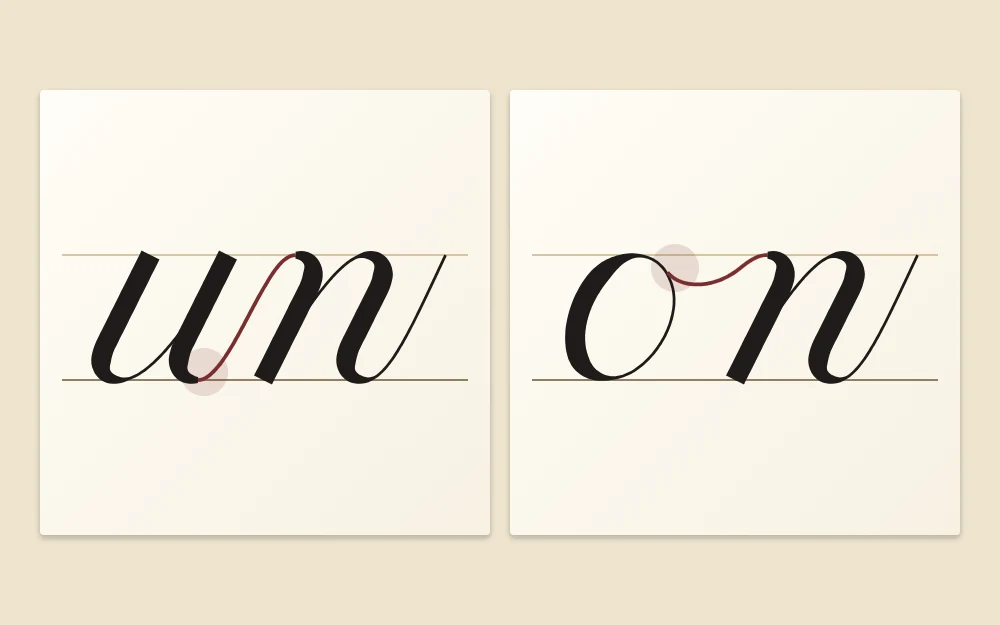
A low join starts at the baseline. Letters that end in an underturn, such as a, d, i, l, m, n, t and u, send a hairline diagonally up to the next letter. This is the most common join, and its length and angle largely decide how far apart the letters sit.
A high join starts near the waistline. The letters o, v and w, and b in many styles, finish at the top with a small hairline that dips slightly and then travels sideways. The next letter cannot use its usual entrance from the baseline, so it begins from that high point instead.
Tricky joins and how to handle them
After o, v and w
Keep the high exit short, with only a shallow dip. A deep dip looks like an extra letter, and a long one opens a gap. In pairs such as “on” and “wi”, begin the next downstroke at the end of the small hairline, at the waistline. In “oe” or “ve”, the hairline flows directly into the small loop of the e.
Into ovals
The oval letters a, c, d, g, o and q do not begin where the incoming hairline arrives. The hairline rises toward the waistline, you lift, and then you start the oval at its own usual starting point. Aim the hairline so the finished oval touches it at about the two o’clock position on its right shoulder.
If the hairline lands too low, it cuts across the oval. If it ends too far away, a gap appears. Pairs such as “na”, “id” and “ug” are good tests.
After r and s
In many plain scripts, r ends in an underturn, so it joins low like an n; just keep its small shoulder clear before the exit begins. The s closes back on itself at the baseline, so it has no natural exit. Either add a short hairline from its base toward the next letter, or lift and start the next letter close beside it. Both are acceptable, and keeping to one choice within a piece looks tidy.
Double letters
Pairs such as “ll”, “tt”, “ee” and “oo” expose every small difference. Treat the two letters as twins: same height, same slant, same join length between them as on either side. In “tt”, write both stems first and cross them with a single hairline at the end.
Letter pairs to practice before words
Pairs isolate one join at a time, which is hard to do inside a whole word. Work through them in this order.
| Join type | Pairs to write | What to check |
|---|---|---|
| Low join into a stem | in, un, mi, ti | Hairline reaches the waistline |
| Low join into an oval | na, id, ug, ac | Oval just touches the hairline |
| High join | on, wi, ve, ou | Short, shallow exit at the top |
| Awkward exits | ra, re, si, st | Clear shoulder on r, tidy s |
| Doubles | ll, tt, ee, oo | Matching height and slant |
Write each pair five or six times across a line, slowly, and mark the one where the join looks most natural. Then compare the others with it.
Common connection problems
- Letters look glued together. The exit strokes are too short or too steep. Let them travel a little farther to the right.
- Letters drift apart. The exits are too long or too flat. Steepen them so they climb along the slant.
- Thick blobs at the joins. Pressure came on before the hairline finished. Lift, then press.
- Joins at different heights. Some hairlines stop halfway up the x-height. Take each one to the waistline unless the next letter is an oval.
Because the length of each hairline also sets the gap between letters, joining and spacing are learned together; the guide to even letter spacing covers that side in detail. Once your pairs look settled, move on to first whole words, where three and four joins follow one another.
Frequently asked questions
Do you lift the pen when connecting calligraphy letters?
Yes, in most pointed-pen and brush-pen scripts. You finish a letter with its thin exit stroke, lift, and start the next downstroke where that hairline ends. The word looks continuous because the strokes meet precisely, not because the pen stayed on the paper.
Why do my connected letters look cramped?
The exit hairlines are probably too short or too steep, so the next letter starts almost on top of the previous one. Let each hairline travel a little farther to the right before it reaches the waistline, and compare the gap with the space inside your letter n.
How do I connect a letter after o in calligraphy?
Finish the o with a small hairline at the top that dips slightly and moves to the right. The next letter begins from the end of that hairline near the waistline instead of from the baseline. Keeping the dip shallow and short stops it from looking like an extra stroke.