The Oval Stroke: How to Practice the Shape Behind a, d, g, o and q
The oval is the base of seven lowercase letters and the hardest basic stroke. Learn where to start, where the pressure builds and releases, three drills, and how to fix common faults.
Practice at a glance
What you need
- Small-tip brush pen or pointed nib in a holder
- Smooth practice paper
- Pencil and ruler
- Ink and a scrap sheet if using a nib
Round letters are where a neat row of practice often falls apart. One o is plump, the next is narrow, a third tips backward, and the word wobbles. Nearly all of that traces back to a single shape, the oval stroke.
The oval is widely treated as the hardest of the eight basic strokes, because it is the only one that has to curve the whole way round, change pressure twice and meet itself at the end. Taken in small pieces, it is very learnable.
Why the oval matters so much
Seven lowercase letters are built on it: a, c, d, e, g, o and q. That is more than a quarter of the alphabet, and it includes some of the most frequently written letters. If your ovals match, a large share of your writing matches.
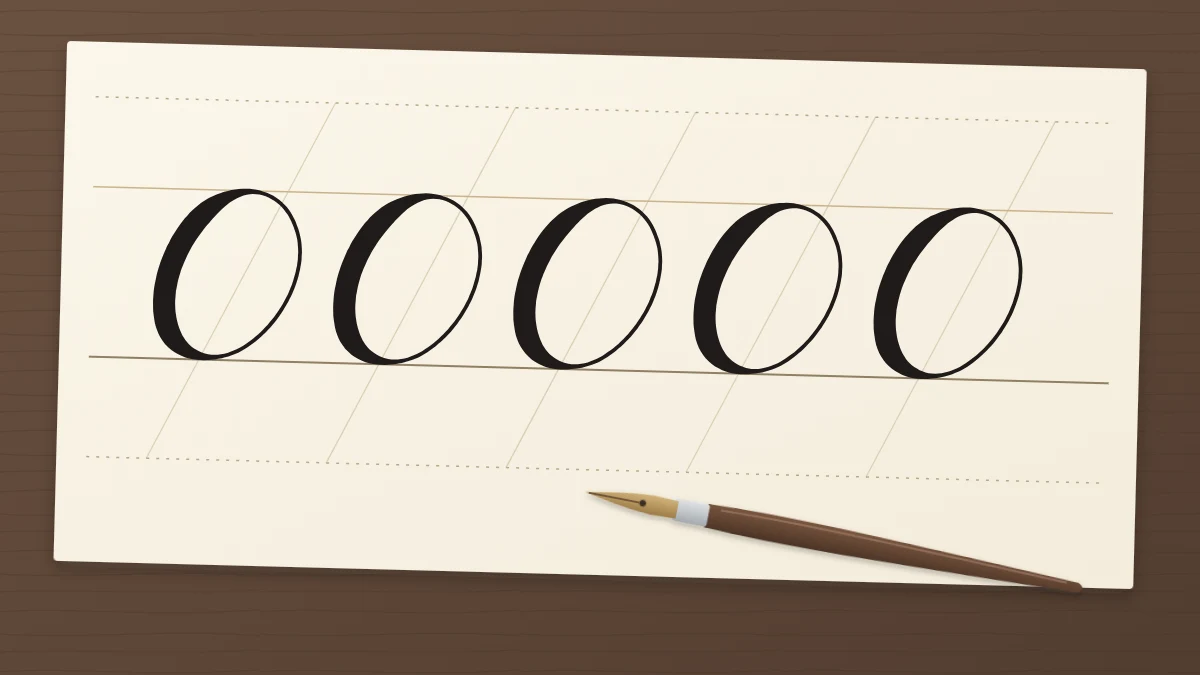
The shape is an oval, not a circle. It is taller than it is wide, a little like an egg, and it leans at the same angle as your downstrokes. A common proportion is roughly half as wide as it is tall, though scripts differ and modern styles are often rounder.
The path, step by step
Rule a baseline and a waistline before you begin, with slant lines across them. Then follow the shape slowly.
- Start around two o’clock. Picture the oval as a clock face and set the pen down on the upper right, slightly below the waistline. Starting at the very top is possible, but the join is harder to hide there.
- Travel counterclockwise. Move up and to the left with light pressure, touching the waistline as you curve over the top.
- Build pressure down the left side. As the pen starts heading down, press gradually. The line is thickest around the middle of the left side.
- Release along the bottom. Begin easing off before you reach the baseline, so the line is already thin as it rounds the bottom curve.
- Climb the right side as a hairline. Keep the pressure light and the curve steady.
- Close the shape. Meet your starting point and stop. The two ends should touch without overlapping.
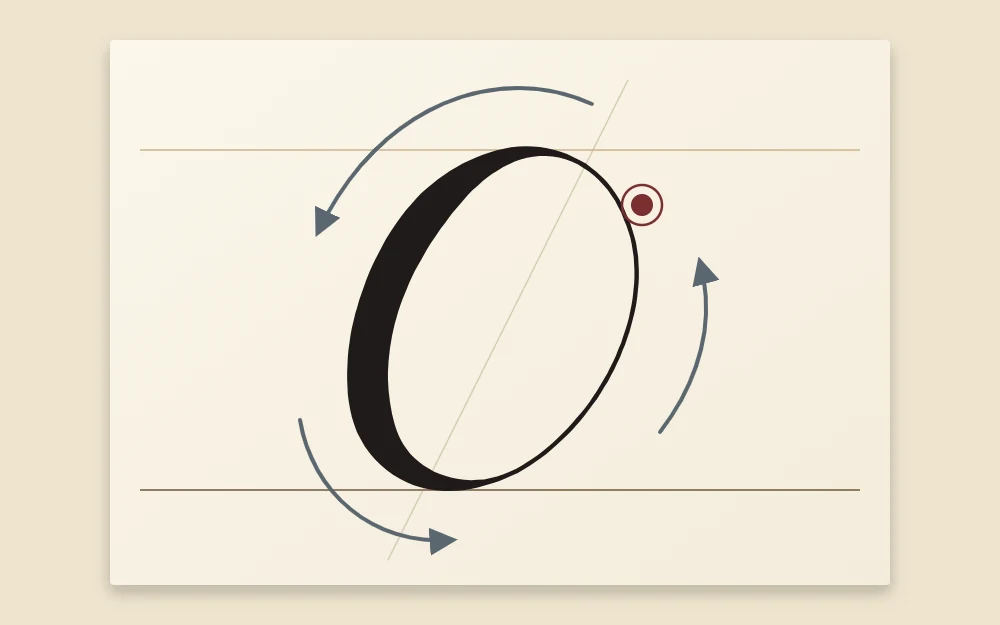
Left-handed writers and anyone using a brush pen at an unusual angle may find a slightly different starting point more comfortable. The direction of the pressure matters more than the exact clock position: light across the top, heavy down the left, light across the bottom and up the right.
Keeping the oval on the slant
An oval has no straight stem to show its lean, which is why round letters drift. The trick is to imagine a line running through the shape from its top to its bottom. That line should be parallel to your slant lines.
Two checks help. First, the thickest part of the left side should run alongside a slant line, not cut across it. Second, the top and bottom of the oval should not sit directly above one another unless you are writing an upright style; in a slanted script the top is shifted to the right of the bottom.
If the lean of your writing changes from shape to shape more generally, the guide to keeping a consistent calligraphy slant covers ruling slant lines and turning the paper.
Tip
Trace the oval in the air just above the paper once or twice before you write it. The hand rehearses the full loop, and the first inked attempt is usually smoother.
Three drills for steadier ovals
Ovals in a row
Write a full row of separate ovals with a gap about as wide as one oval between them. Look along the row afterward and compare widths. This drill trains size and proportion.
Ovals touching
Write a row where each oval just touches the one before it, at about the middle of its side. Because the shapes are side by side, any change in lean shows up at once as a gap that opens or closes. This drill trains slant.
Half ovals
Write only the left half: over the top, down the thick side, round the bottom, and stop, like a letter c. Then write a row of right halves as hairlines. Splitting the shape lets you work on the pressure change without worrying about the join.
A row or two of each is plenty for one sitting, about 10 to 15 minutes in total.
Common faults and what causes them
| What you see | Likely cause | What to try |
|---|---|---|
| Flat sides | Pulling straight down like a downstroke | Keep the pen curving the whole time; practice half ovals |
| A pointed bottom | Holding full pressure too long, then turning sharply | Start releasing earlier, well above the baseline |
| A gap at the join | Stopping short, or drifting outward on the way up | Aim at the starting point from halfway up the right side |
| A blob at the join | Overlapping the start, or arriving with pressure | Arrive at hairline pressure and lift as soon as the ends meet |
A lumpy outline with several small corners usually means the stroke was made in short pushes from the fingers. Try moving the whole hand in one slow, continuous motion. With a pointed nib, a blob at the join can also mean the nib is carrying too much ink, so touch off the excess on the rim of the bottle or a scrap sheet first.
From oval to letters
Once the shape closes cleanly, it turns into letters with very little added. An oval with an underturn on its right side is an a. Give that underturn a tall stem and it is a d. Add a descending loop and you have a g. Leave the right side open and it is a c.
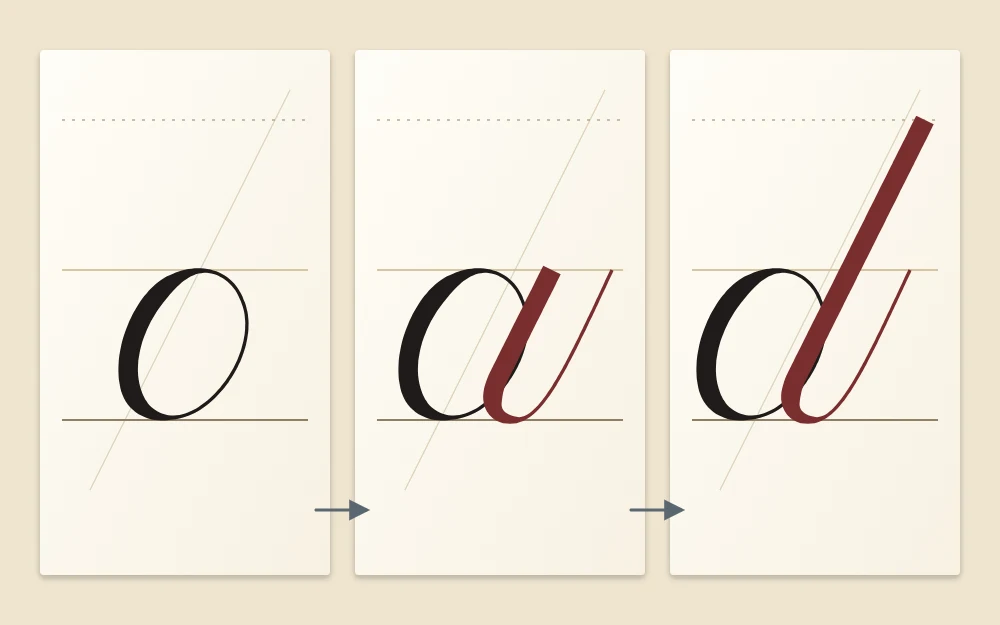
The added stroke should touch the right side of the oval without cutting into it, and it leans at the same angle. The guide to lowercase calligraphy letters takes the whole oval family in order, along with the other letter groups.
How to tell it is improving
Skip the question of whether any single oval is good and look at the row instead. Are the shapes about the same width? Do they lean together? Is the thick side in the same place on each? Evenness across a row is the real target, and it arrives gradually, a few shapes at a time.
Frequently asked questions
Why do my ovals lean in different directions?
An oval has no straight stem to guide it, so its lean depends on where the top sits relative to the bottom. Ruling slant lines and matching the thick left side to them helps. Writing ovals that touch each other also makes any change in lean easy to spot.
Should I start the oval at the top or at the side?
Many people start on the upper right, around two o'clock, because the join is then hidden where the next stroke of a letter such as a or d will cover it. Starting at the top also works. Try both and keep the one that closes more cleanly for you.
Can I draw the oval in two strokes?
Yes. Writing the left half and the right half separately, each from top to bottom, is a common approach, especially with a pointed nib that resists being pushed upward. A single continuous stroke is the usual goal, but two halves that meet cleanly look the same on the page.